
If you are ever fortunate enough to purchase an original New Generation 10 or 20 series tractor with a perfect nose on the hood, I would suggest you also rush out and purchase a lottery ticket because the odds are about the same for either one. When Henry Dreyfuss designed the New Generation hood, it was definitely a bold design statement for that era in time. The fact that these tractors still look up-to-date and modern 40-plus years later is a testament to this design feat.
As advanced as this hood design was, it seemed to come with an invisible bulls eye on the nose. Or maybe the hood came with a supernatural power to attract itself to other objects like bale racks, barn cleaner chutes, chopper wagons, tall gates or trees and the like. No matter what we would like to believe, the bottom line is the nose on these hoods took a beating over the years and will be an area that needs attention for those of us collecting them now or even for dealers and equipment jockeys trying to make one of these tractors look good for resale.
Normally this column is not used to endorse products, but this time an exception is justifiably in order. These New Generation hoods had some radiused curves that will prove to be a challenge to get repaired so the nose looks correct. If you’ve ever tried to “free-hand” one of these hood noses back into shape, you’ll know exactly what we are talking about. A company called Sunsdahls’ Restoration Tooling has come up with a sturdy, easy to use tool that will help you get these 10 and 20 series New Generation hoods looking factory new again. If you are going to work on these New Generation tractors, this tool is a “must have.”

Let’s take a look at a New Generation hood that seemed to be a hopeless “Case” (pun intended). This hood nose is smashed in deep enough that the base metal cracked and split in several places (Photo 1). Before you take hold of your new Sunsdahl hood tool and start working, there are a couple major issues you need to address first to end up with a successful finished project.


When a deep dent occurs, the base metal stretches into the shape of the dent. To successfully straighten the metal back into place, you need to shrink the stretched metal. An easy way to accomplish this is to heat the center of the dent red hot (Photo 2A). With the dent heated red hot (Photo 2B), you need to apply a cold, wet rag on the red hot metal (Photo 2C). In Photo 2D, we can see after just one application of heat and quenching, this dent has really responded well to heat shrinking. Though you can repeat the process more than once on a dent, it is best if you can minimize the number of times you do this since the metal will tend to harden.


Now that we have the most severe dents heat shrunk back to being fairly close, there are still the ugly splits and cracks to contend with. Before you begin this phase, you need to hold the hood to the correct width. One method you can use is to measure the width of the radiator, then add one inch to this dimension. Simply put a double loop of electric fencing wire through the front hold down holes of the hood. Using any piece of pipe, tube, bar, wood or whatever you have there in the shop, use it to twist the wire tight until it pulls the hood into the correct width (Photo 3). With the hood pulled in to the correct width, we can start fixing the various splits and cracks in this hood. A wire feed welder works well, or if you don’t have a wire feed welder, you can braze the cracks and splits together (Photo 4). It is critical that you have the width of the hood set correctly before you start this phase of the process because once you weld up or braze the cracks and splits, the shape of the nose will not turn out correctly if the width is not set correctly. You will need to “rough out” the cracks and splits before you weld or braze them. With the width set correctly, and all of the cracks and splits repaired, we can move on to the final shaping and smoothing of the sheet metal.


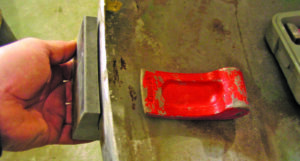
If you don’t have a hood in this rough condition, consider yourself fortunate. Now that we have the deep ugly dents shrunk and the cracks and splits repaired, it’s time to put this awesome tool we just purchased to work. I’ve found using the tool works best with the hood upside down and tapping with your basic body tools from the back side of the hood (Photo 5). A combination of body hammers and basic body dollies pounded from the backside with the Sunsdahl nose tool on the outside of the nose will allow you to perfectly shape your New Generation hood nose (Photo 6).

A method that works well is to shape the nose using the shaping tool until you think you have the nose where you are satisfied with it. Now spray a coat or two of a fast drying primer on the nose, then block sand the nose to see where you have low spots yet. The low spots will of course be the areas that still have paint on them after you have done your block sanding (Photo 7). Now that additional low areas have been identified, you can put your shaping tool on the outside of the nose again and focus just on the low areas from the back side of the nose with your body tools. You can get the nose shaped very, very closely using the shaping tool (Photo 8). Depending on how patient you are, you can get the nose metal close enough to apply four or five coats of a filling primer, then block sand the nose and if necessary, repeat the fill priming and block sanding process another time or two until the block sanding reveals a perfectly smooth nose. Another option is to apply a very light coating of quality body filler and sand it smooth. Personally, I like to get the base metal close enough that prime painting and block sanding gives you the result you want (Photo 9).


With the use of this tool, any of us can revive those beat up, smashed up New Generation hood noses. When your project is completed, you will have an end result that will impress even the most critical because the hood will be shaped correctly and very minimal, if any fillers will be used (Photo 10). This tool is sturdy enough to use over and over again so all of your New Generation projects will have perfectly shaped hood noses and the original Henry Dreyfuss design will continue on as up-to-date now as it was 40-plus years ago. If you are going to be working on New Generation tractors, you can find this tool advertised periodically in Green Magazine or call Sunsdahls directly at 507-210-1118. As always, enjoy this great hobby of ours to the fullest and bring a new collector into this wonderful hobby of preserving our agricultural history. Just think what farming would be like today if we were still using the old team of horses and the modern tractors of today didn’t exist.

To purchase the Sunsdahl forming tool go to www.sunsdahltooling.com or call 507-210-1118.


