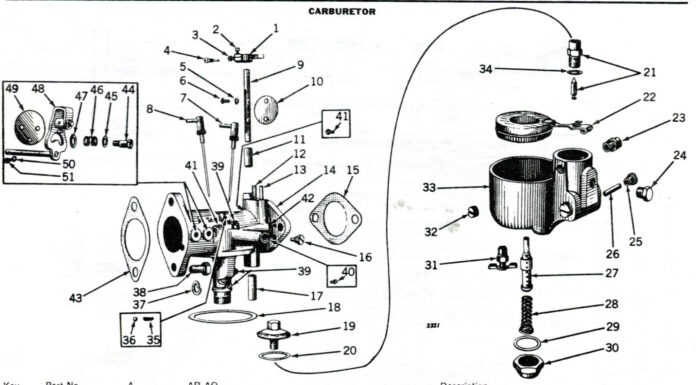
Much has been said and done in the direction of old tractor carburetors, especially with the restoration era becoming so very popular and also since wasting gas costs dearly these days. Everyone seems to be rebuilding their own carburetors or has a friend who’s really good at it. Since our friends from the “Land of the Great Wall” entered the tractor parts business, carburetor repair kits can be found in stores right next to the dog food and kitty litter; oh, and I should mention—kitty litter is a very good substitute for floor dry (and is somewhat less pricey, too).
Basic good practices of carburetor overhaul should always be followed: complete disassembly, thorough cleaning, reassembling accurately to suggested specifications and then doing whatever is necessary to get the throttle shaft tight again.
So you put your rebuilt carburetor back on, start that baby up and go through the running adjustments—#1 load ( if it applies), #2 idle mixture, #3 idle speed. She runs like a top and doesn’t seem to leak anymore. You pat yourself on the back and head for the house.

Next morning, you open the shop door, smell gas and there it is—a puddle of gas on the floor under the carburetor, or in the case of “lettered” model John Deeres, now a cylinder or crankcase with gas in them. Now what? That darn carburetor still leaks. Here is where we separate the men from the boys. You have some options—you can move the tractor to the machine shed with a dirt floor where the gas leaking would not be as noticeable or you could start shutting off the gas again at the carburetor, but that’s why you took it apart in the first place.
I would like to get into more discussion about simple carburetor repairs and circuitry such as economizer circuits or throttle door placement to get some carburetors to idle properly. We’ve not just scratched the surface discussing carburetor problems. Causes and remedies for internal carburetor leakage will be discussed in greater detail. I must tell you one of my latest customer carburetor stories. A man walked into my shop carrying a carburetor that he had recently rebuilt from his 1945 John Deere “A.” After slamming it down on the service table and calling it names I should not repeat here, he said that he had given up trying to make it stop leaking gas into the engine.
A clue as to what might be wrong came to me when he mentioned that the carburetor hadn’t leaked that badly before he rebuilt it. After going through many potential solutions, the problem still persisted. I found (while using my home built test stand) that as soon as the gas was turned on, this carburetor overflowed. It was as if the float was being held down and not allowed to float up and shut the gas off. I then found the problem—a plugged bowl vent. Every carburetor must vent its fuel to the atmosphere by some means. When this customer had bead blasted the castings, he had plugged the bowl vent with its own dirt and sand. This caused the float to be held down as gas entered the bowl and the air escape was restricted. The float was held down until air slowly vented from the bowl, but by this time, it overflowed. Make sure your carburetor can vent its bowl—the simple solution to this problem.
In addition, another common problem with many carburetors—I have found that gas will slowly leak down the threads of the gas seat and past the gasket under the seat, due to the rough casting of the carburetor in the gasket area. The result is the same as a bad needle and seat—overflow of the carburetor. A solution—very lightly coat the seat threads with a small amount of thread sealer or liquid Teflon. As for the seat gasket, try spraying it with gasket adhesive to give it a little help sealing the bottom of the seat.
The second cause of many persistent leaks involves the fuel float. New or used, the float pins and pivots must not let the float drift sideways. This causes the float to lightly touch the bowl and restrict its free movement to shut off the gas properly. Gently pinch the brass float pivots to take out any sideways movement, but not to restrict its free travel. If the pivot pin is loose in the pin stand, the stand can be carefully cut and pinched together to make the hole smaller, thereby holding the pin tightly. Doing these things enables the float to work more accurately and also keeps it from wandering in the bowl.
My last trick in solving the “dribbles” is to polish the sides of the needle with 320 or 400 grit sandpaper. The gas needles most always have triangular sides—they guide its travel in the seat. Polish these edges carefully until they are smooth and shiny.
This column is written by Ron O’Neill, who lives at Oshkosh, Wisconsin.


